Touchscreen
- Details
- Challenges
- Links
- HS Touch tips (nice!)
- Albatron tips (nice!)
- Screenshots
News
- August 2011: Looking at the current market you should NOT buy a Windows based touch-screen.
Go with Android which is also supported by Homeseer Touch. - May-01 2009: Most things are working. Check out the Albatron TeePC tips at the end of this page!
- Apr-17 2009: It looks like the domotica community is going to order a wireless Albatron 7″ touchscreen… and I’m in ;-)) (manufacturer / forum)
Goal
Touchscreen in living room with following info:
- Lamp/Device status
- Power usage
- Environmental info (temp,hum and in future also wind/rain)
- Weather, Traffic information
- Camera views
- etc.
How
- Connect touch-screen (WLAN) & install HS Touch client
- Order/install/configure HS Touch
- Designed screens using Powerpoint (template .PPTX ) with this background and button_select graphics
Hardware/Software
There are a few options:
- €180 Mimo UM-730 touchscreen (Mimo) (forum/samenkopen)
- Advantage: Everything over USB (video, KVM, touch, audio)
- Disadvantage: Only 7″, resolution 800×480
- €205 Vega 10.4″ touchscreen
- Advantage: Large 10.4″ screen, higher resolution 800×600
- ($200) HomeSeer Touch: Software that provides touch-screen interface & design.
- (€40) Other costs (tbd)
Details
What should the touch-screen do?
- Control lights
- Individual lights
- Events (watch TV, go to sleep, away)
- Control events
- Watch TV
- Listen to music/radio
- Go to Sleep
- Power status
- Power usage per device / per room
- Power usage graphs
- Environmental status
- temperature/humidity in and outside the house
- (future) UV-factor, windspeed, rainfall
- Day-to-day info
- Weather forecast / rain forecast (buienradar)
- Traffic info
- TV guide
- Camera control
- View live camera streams
- Control PTZ camera’s
- View previous camera captures
- Music Control
- Control music / webradio play
- Automatically turn on the devices required
- iTunes integration?
- Alarm panel
- Alarm status (door/door-lock/smoke-detector/water-sensor)
- Set alarm mode (armed away, armed away short, armed home)
- Last alarm messages
- Statistics
- Graphs for doorbell-rings/door-open/ventilation
- Stats for doorbell-rings/door-open/ventilation (today & total)
- Diskspace statistics
- Network statistics (device connectivity / bandwidth usage)
- Home-View
- per Floor (devices, electricity usage, temp/hum, alarm)
Challenges
Which challenges will I run into?
- Time to configure everything ;-)
- Turn display on/off. When to turn off/wake-up?
- Info WAP wake up powerstates
- Motion
- Time-based
- Manual off until next auto turn-on or event (motion)
- Screen location
- Where
- Not visible from outside
- With construction that allows you to move the display
Links
Links for touch-screens or HomeSeer Touch.
- Example URL for Plugwise graphs
- TV-Guide RSS (Dutch)
- VNC server for Win CE
- HomeSeer Touch Webinarrs
- HomeSeer Touch forum
- Photoshop button tutorial
- Web App buttons
- Free buttons
- Vista button themes
- Colorful buttons
- Buienradar weather map
- Weer Online
- Click on the Weather, Wind and “Weercijfer” tabls and ‘copy image URL’.
- The Image URL contains the location and current date (and next 4 days)
- You might be able to use Javascript to insert the dates (untested example):
Document.Write("first_part_of_URL"+GetYear()+"_"+GetMonth()+"_"+GetDate()+"rest_of_url");- Add “300” at the end of the URL and you’ll get smaller maps
HS Touch tips (General)
- NEWAdd Plugwise Charts to your HST screen
- You need to run the latest Plugwise Source software
- Add an image to your HST screen. Note the size of the object
- Set the ImageNormal URL to
- https://<plugwise_IP>:<port>/pwgraph/?width=553&height=341&rmids=<pw_module_id>
- Set the values for width and height that you need
- Add buttons with action:
- On Click: Set an Elements URL, select image object and enter the URL to a different Plugwise Module
- Repeat for all PW devices
- Add buttons for different periods (haven’t worked out how to do this without adding day/week/month buttons for each appliance).
- NEWManaging numbers
- <under construction>
- Image Format ‘Normal’ is faster than ‘Stretched’ (why? even if it’s a text box?)
- Plugwise device status (if you use my Plugwise script)
- Create Plugwise device AND Plugwise_Status device
- When running Plugwise on/off scripts, also update the status (string & value)
- When clicking a HST button controlling a PW device, run a script to turn on/off the light BASED on the matching status device. (turning it into a ‘toggle’)
- The status device can be used to map the status bar (red/green)
- Graphics: I found that there’s many error messages if you pick graphics from a folder other than the \skins\<skinname>\graphics folder.
- If you run the HS Touch designer/client on your local network AND on remote networks, the apps time-out when connecting. You have to update the IP address (from local to your ISP address) before moving on. You can automate this by running a .reg (registry file). Download an example here: HS Touch registry update
- Open the 2 .reg files and check if the registry ‘path’ matches your HSTouch deployment
- Make sure you have configured port forwarding from the internet to your HSTouch server (say from 145.211.138.20 port 10200 to 10.1.1.20 port 10200).
- Want to replace ‘<br>’ in an RSS feed? Tested: In 1 step from RSS with REGEXREPLACE is not going to work. How to get it working? (also applies to other string operations in HST)
- Create text object with Name=”test_rss_weer” (instead of the default “Label 239” etc)
- Text: [$RSS=https://www.weather_rss_URL_here.com->item->description->0]
- Create 2nd text object with Name=”test_rss_weer2″
- Text: [$REGEXREPLACE=[$ELEMENT=ScreenTest->test_rss_weer]-><br>->]
- This replaces <br> with ‘nothing’. Make sure you change the ‘ScreenTest’ with your screen-name.
- You could make the first text object invisible, extremely small or hide it by using the same color as the background.
- Create text object with Name=”test_rss_weer” (instead of the default “Label 239” etc)
- More info about VB scripting in fields in HST.
HS Touch tips (Albatron TeePC)
- Turn OFF bluetooth
- Turn OFF camera
- Modify Power settings
- HST menu access by long-clicking the top LEFT (instead of right)
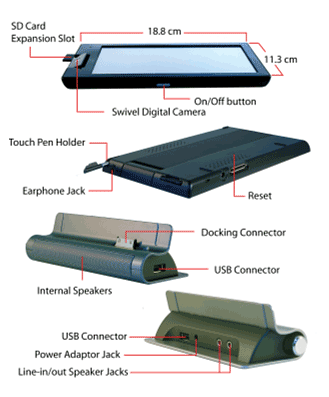
- Albatron touchscreen: if it doesn’t start, check the “lock” switch next to the AC adapter plug
- Enable “ClearType” fonts that look a lot better (Windows CE)
- Download registry editor: “RegEdit”
- Copy to TeePC flashcard
- Run Registry Editor
- Go to [HKEY_LOCAL_MACHINE\System\GDI] and add the key “ClearType”
- Close all apps on your TeePC and press the reset button on the back
- To get more fonts, copy the .TTF files into the Windows CE \Windows\Fonts folder.
- File access: Use the freeware W-CE client of Total Commander. (Erik from Domoticaforum.eu)
- It will offer you in one screen the directory structure of the Albatron and your Desktop PC. It allows to manipulate files across the network. Albatron and Desktop need to be in the same network domain. You can find the freeware at Windows Commander CE. To install:
- Download the tcmdwincearm.cab (link: CAB , arm/xscale/pxa)
- unzip the file 000CECMD.002 and rename it to CECMD.EXE, copy this file to the Albatron.
- I did not try the beta version 2.52 which should support FTP via SSL.
- To connect your Albatron to the network:
- configure your network authentication (Control-Panel/Owner -> Properties -> Network-ID)
- Open command prompt and type: net use * \\<serverhostname>\<sharename>
- Enter user name & password when requested. Now you can access these shares.
- If you cannot remove the titlebar:
- Use Windows CE registry editor (RegEdit 0.11 Eiichiro ITO) to modify this entry:
- \CUser\Software\HomeSeer Technologies LLC\HSTouch\Add Titlebar: SZ: False —> set to True
- To increase the user experience: add sounds that indicate when you clicked the screen (thanks Erik)
- Go to the control panel -> volume & sounds and tick the box for key clicks and screen tabs.
- The touch screen requires a fair amount of pressure to respond.
- The audible click response will allow you to get used to the “touch & feel” of the Albatron.
- To turn off your device for a longer period: (thanks Erik)
- Go to control panel -> power -> schemes and check the settings for AC power and Battery power.
- Use the bottom switch only for long time storage or in case you need a reset of the W-CE.
- Power management settings
- User idle: screen dim
- System idle: screen off
- Suspend: system suspend. Wake up by keeping the button at the top pressed for about 2 seconds
- VNC server for TeePC PocketVNC
- Troubleshooting HST deployment to client: keep looking at the client screen when it updates – you might spot an error message


Nice page, test comment
Oh oh, I feel a new hobby coming up!